Peculiar Pentest Scenes - Client-side HTTP Encryption Folly
Table of Contents
Hello fellow researcher! Welcome to the Chapter 1 of Peculiar Pentest Scenes series of blogs, where I take you through weird situations that I have encountered while being in different penetration testing engagements. In this post, I’m going to take you through Client-side HTTP Encryption and it’s nuances, how easy it can be to exploit web and mobile applications implementing this feature, and what are the possible right/correct ways to do it.
#
What is Client-side HTTP Encryption?
Before you start screaming, NO! It’s NOT SSL/TLS. NO! It’s not E2EE either. Client-side HTTP Encryption (also some researchers call it Application Layer Encryption) means sending and receiving encrypted HTTP requests and responses. Basically requests like POST, PUT, PATCH etc, or their data are sent in an encrypted and encoded wrap.
##
How it works?
I have observed there are 2 broadly used ways in which Client-side HTTP Encryption works:
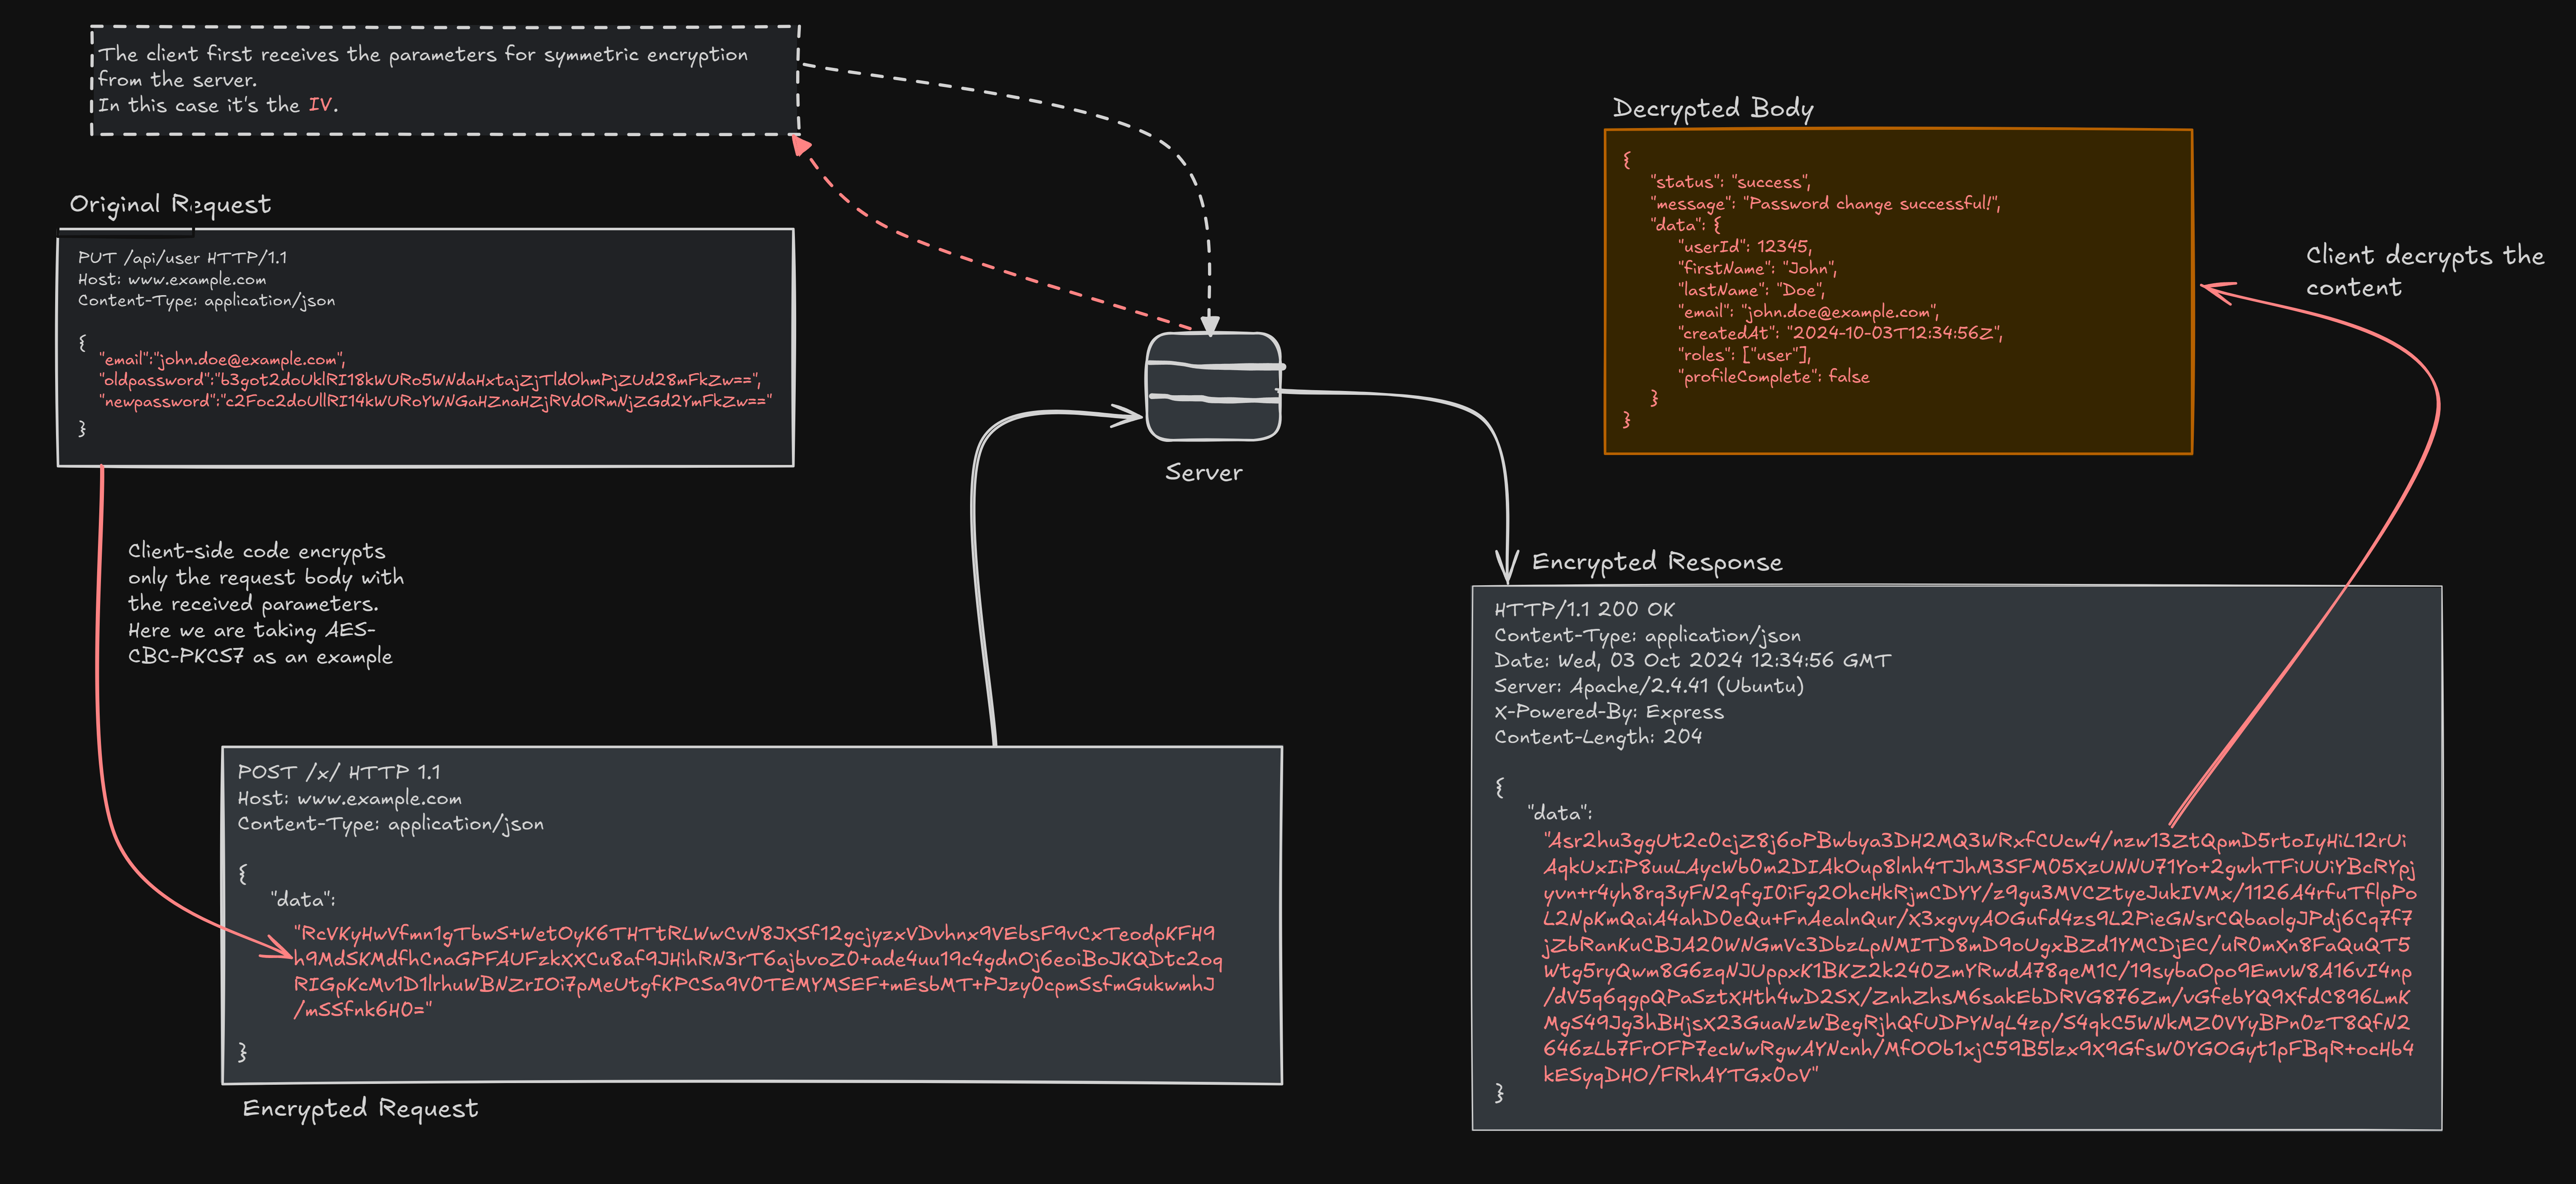
- Total Encapsulation: Encrypting and encapsulating an entire request, including methods and headers within a json.
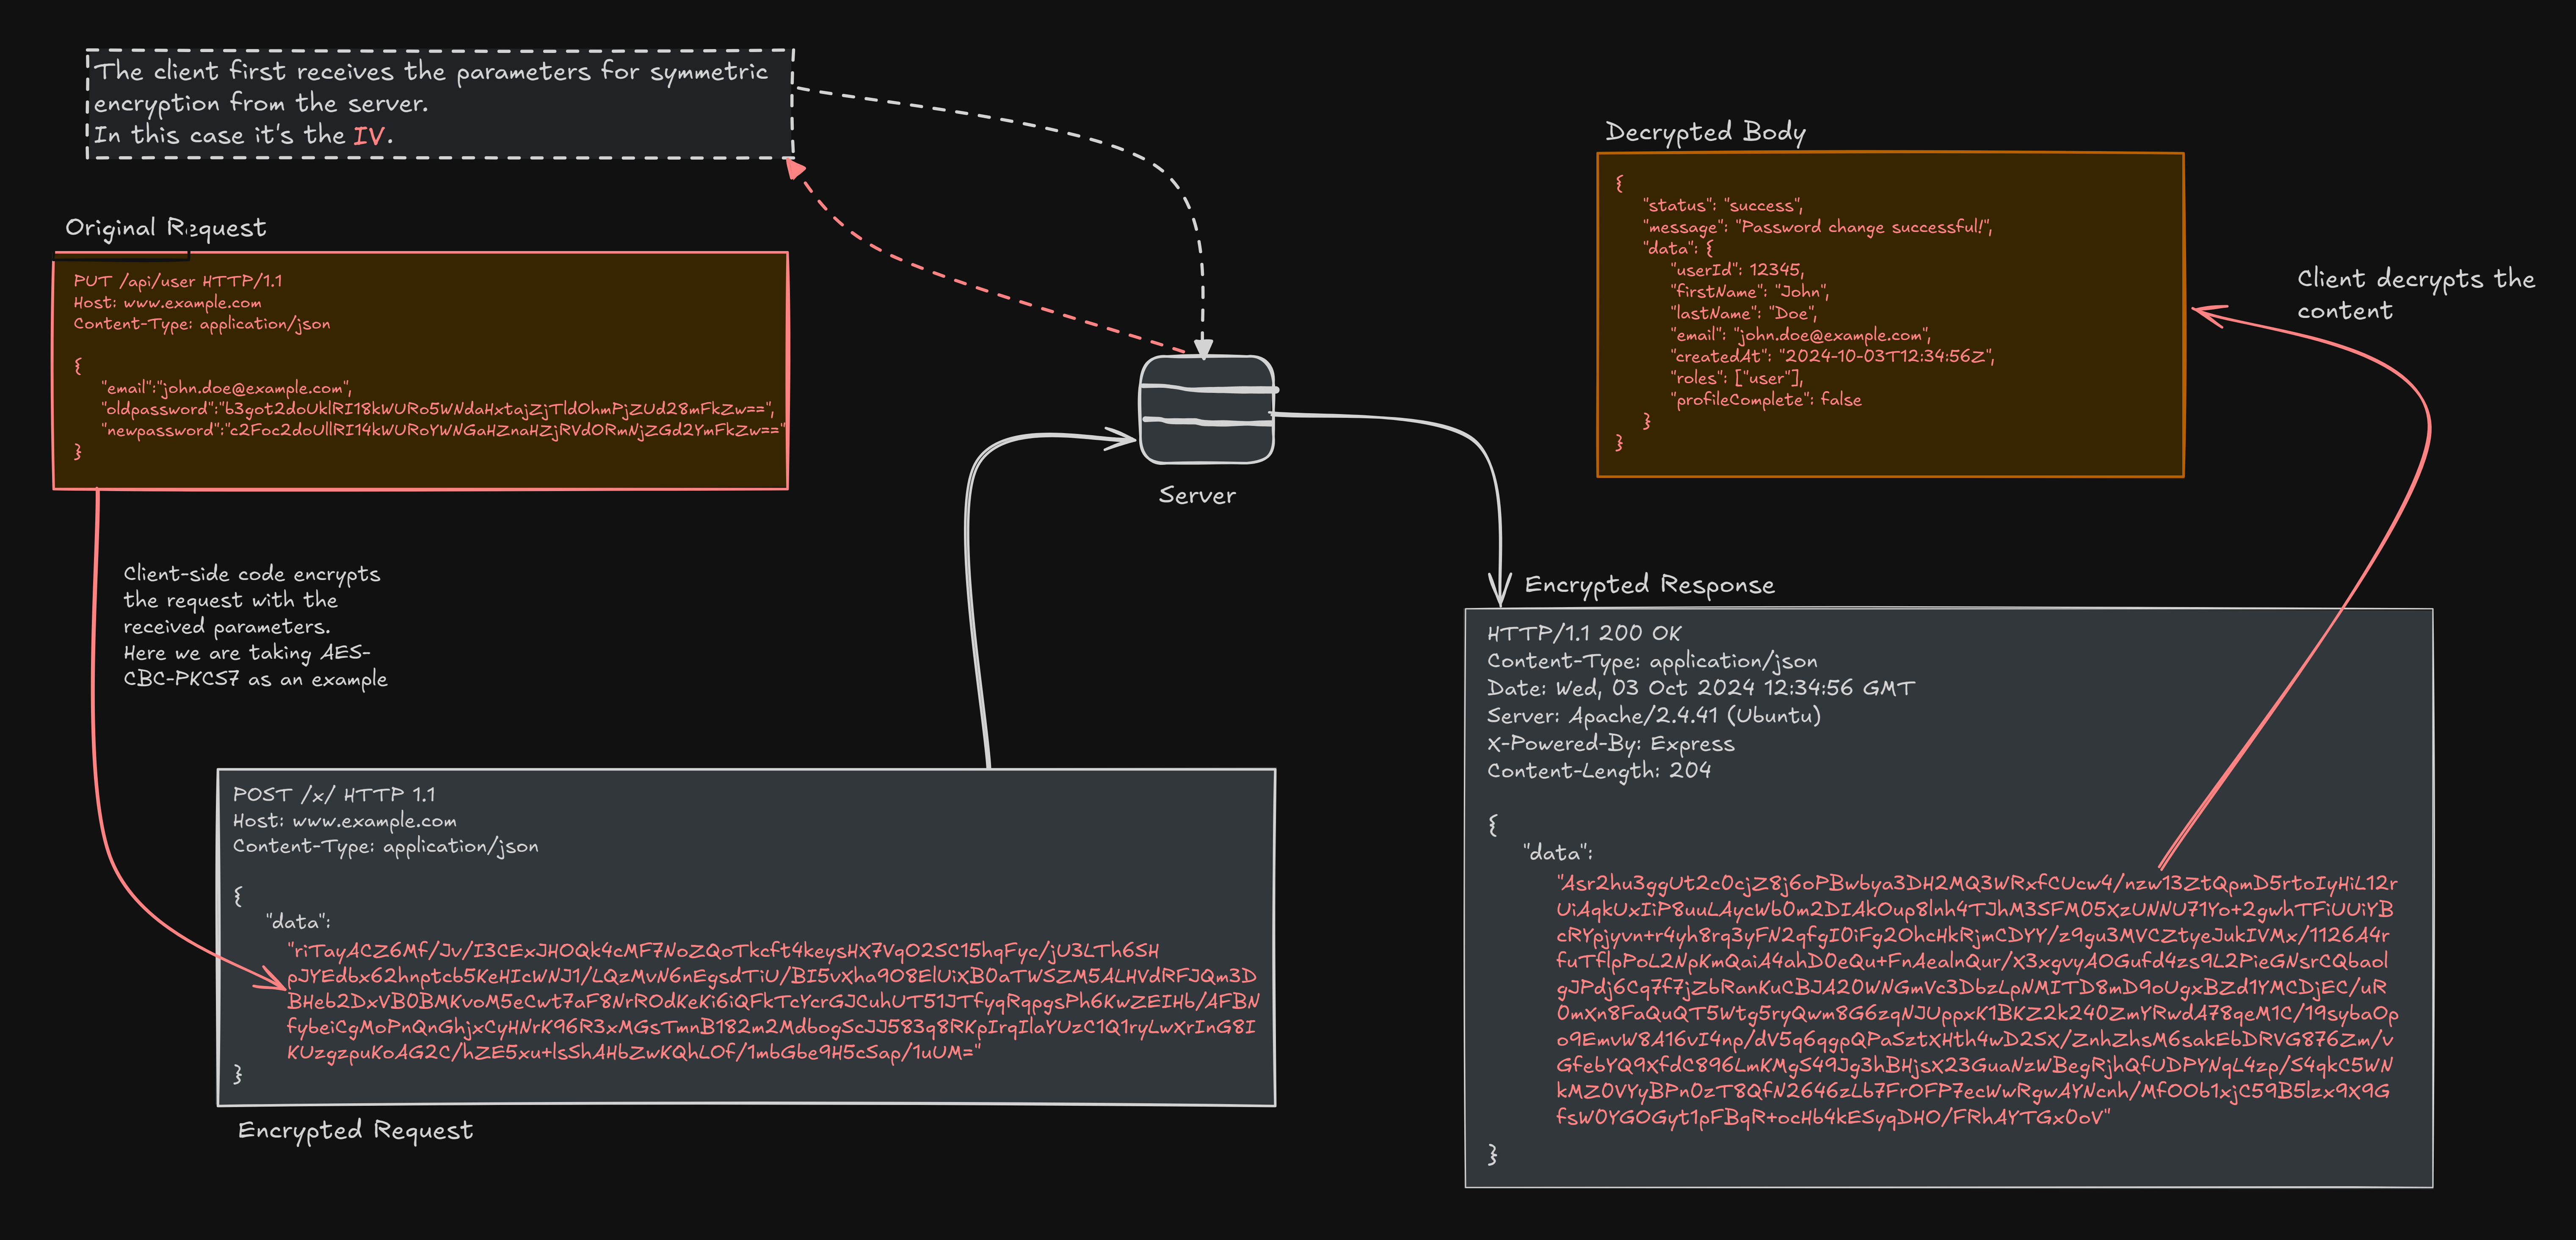
- Request Body Encryption: Encrypting and encapsulating the body parameters of a request within a json.
This article from Unified ID is a good explanation of how its works with an example implementation.
#
Run Through
##
Background
I was performing a pentest engagement of a multi-platform application used by the employees of a bank. The application could be used as a web or an android application, which made it clear for me that the application backend was same for both. I started by connecting over their VPN and browsing the web application (after logging in with the credentials I was provided) through Burp and ZAP (in Attack mode). I find ZAP’s attack mode more useful as it rules out some of the basic test cases for me.
PS a detailed run through is not possible because of “obvious reasons” but I have cherry picked the most interesting parts!
##
Initial Observation and Hypothesis
After a while I noticed certain requests, more specifically POST requests, having body in the following format:
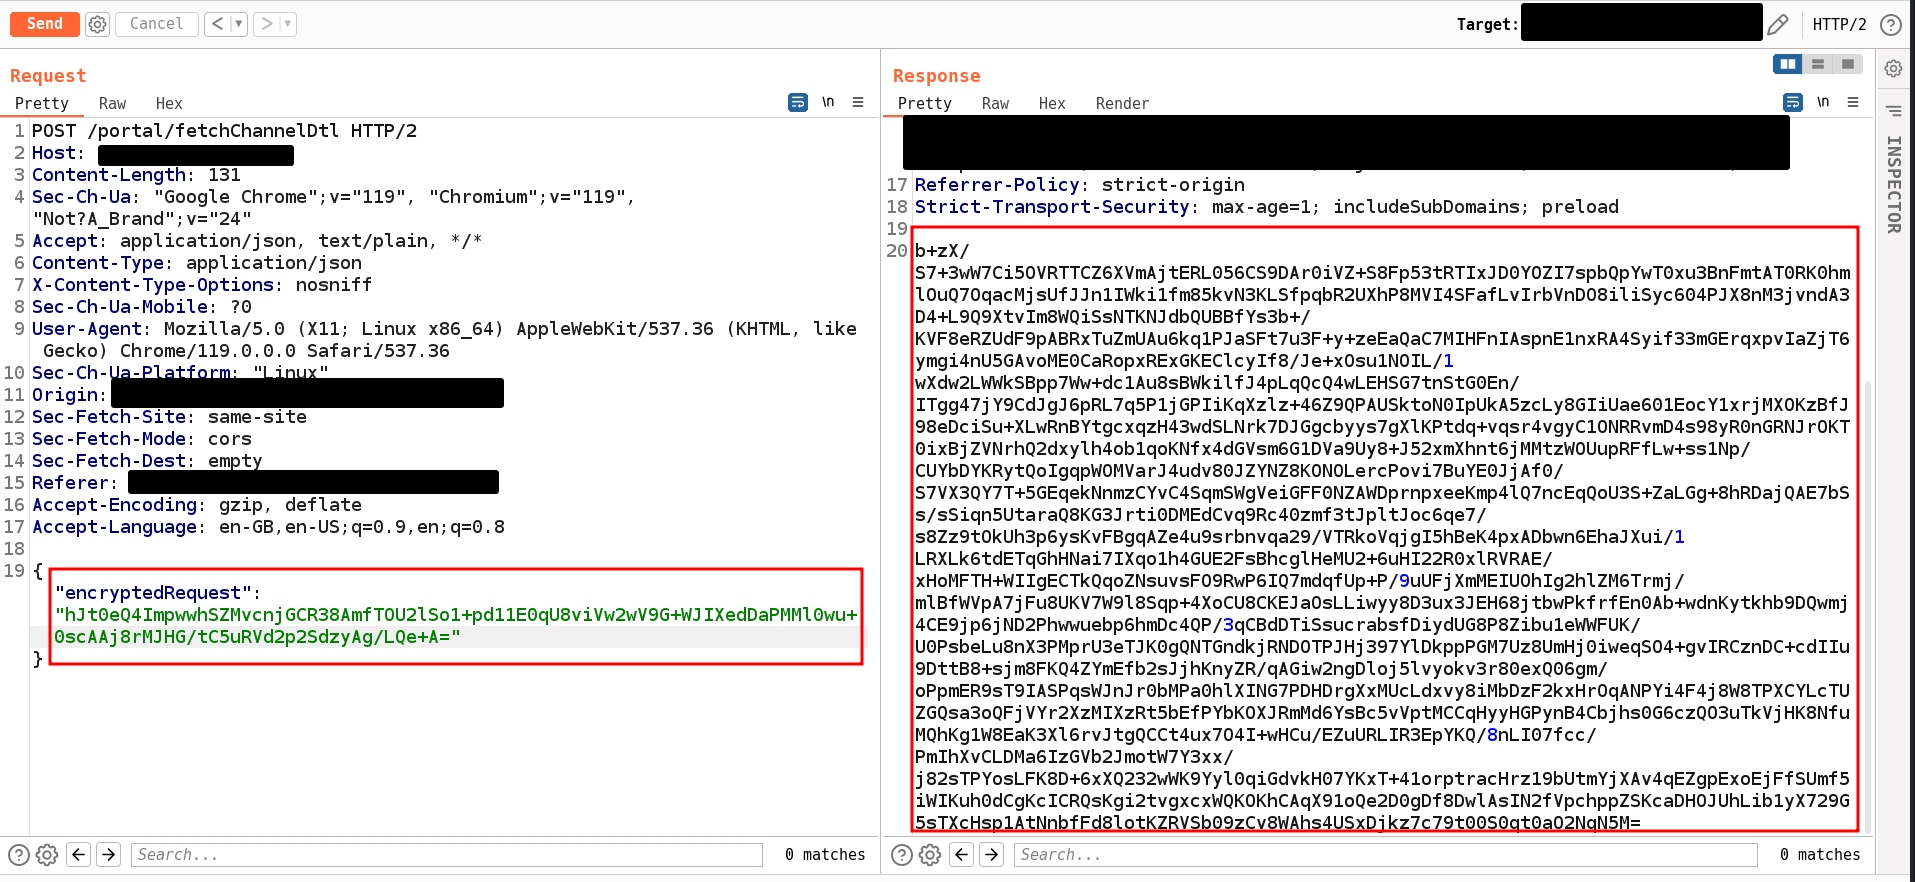
Clearly the request body was encrypted. Typically, this a good primary defense for mobile applications but for web applications implementing it can be a headache because of the nuances. One of the major ones is the IV being a constant throughout a session or worse being a complete constant just fetched through an async request.
Trivia: An initialization vector (IV) is a random value used alongside a secret key for data encryption to help prevent cyber attacks. Also known as a nonce (number used once), this value is used only once per session, ensuring that a potential attacker cannot decrypt the message without authorization.
To confirm this hypothesis, I observed and compared same requests made at different times (after refreshing the browser) using both ZAP’s diff add-on and Burp’s comparer. Apart from the headers, the payloads were identical which meant the IV could be grabbed via some source code review and performing some really silly overrides.
Now it was time to find the encryption code in a huge 20,000+ lines minified javascript code. :)
##
A Breakthrough
After searching through many lines of code using the phrase “encrypt” I stumbled across an interesting block at the very end of the minified mumbo-jumbo. It seemed like a block of code belonging to the library crypto-js. All thanks to the beautiful readme provided by the library’s maintainers and the community, which had the exact same example implementation of an AES.encrypt() block.
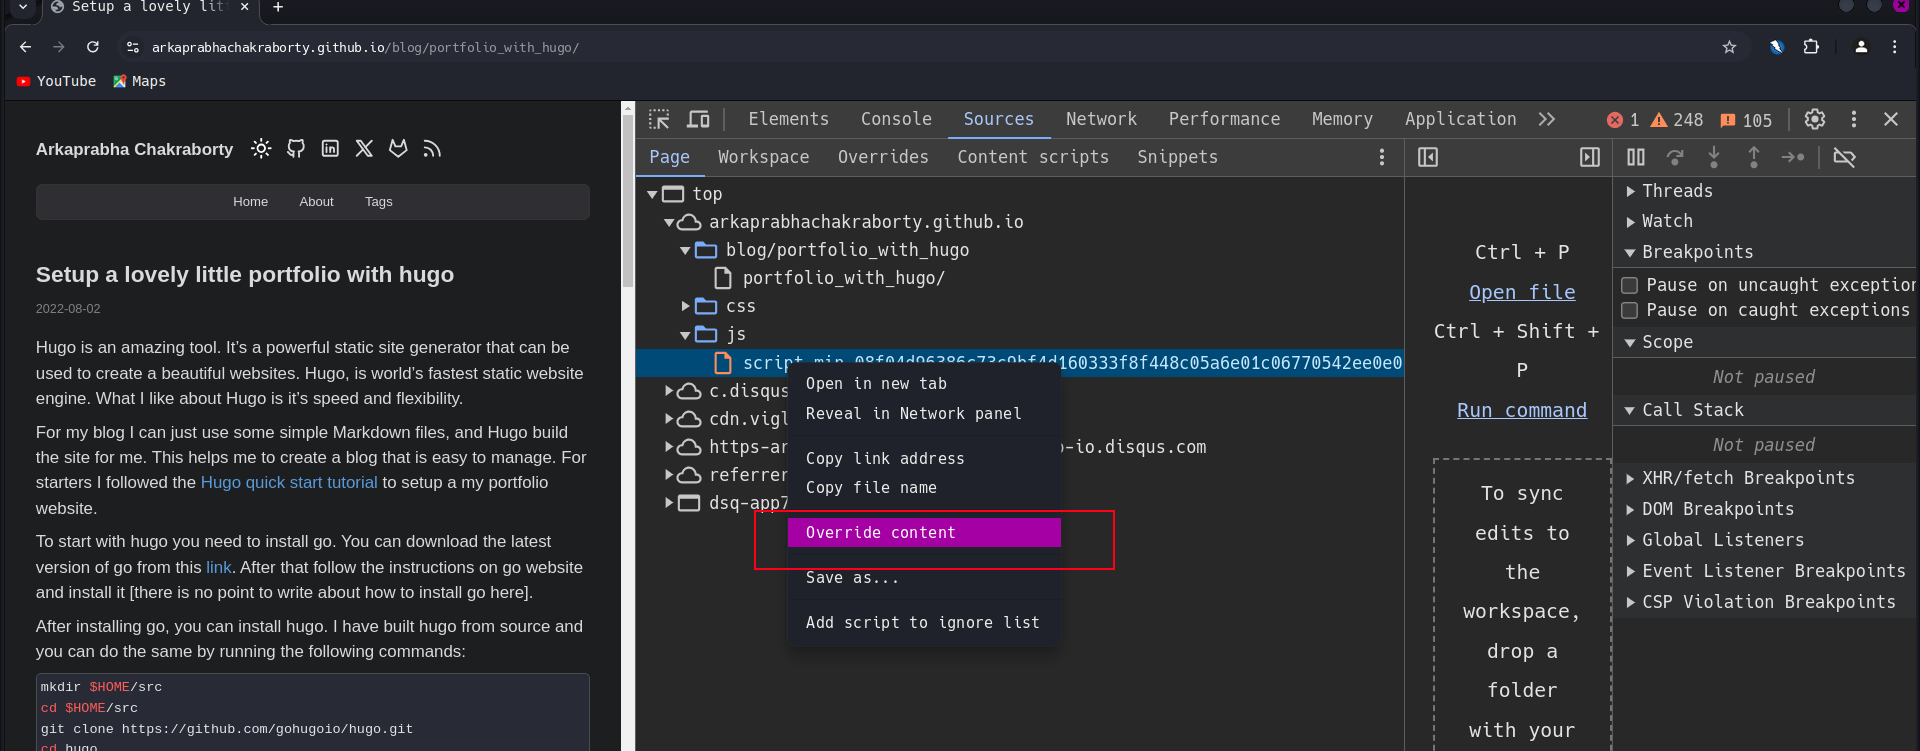
Time for the chrome’s underrated feature: Browser based overrides! I have shown a simple example using my blog on how to perform an override.
 I dropped in some
 console.log() within the blocks like shown below to grab the internal working of the block.
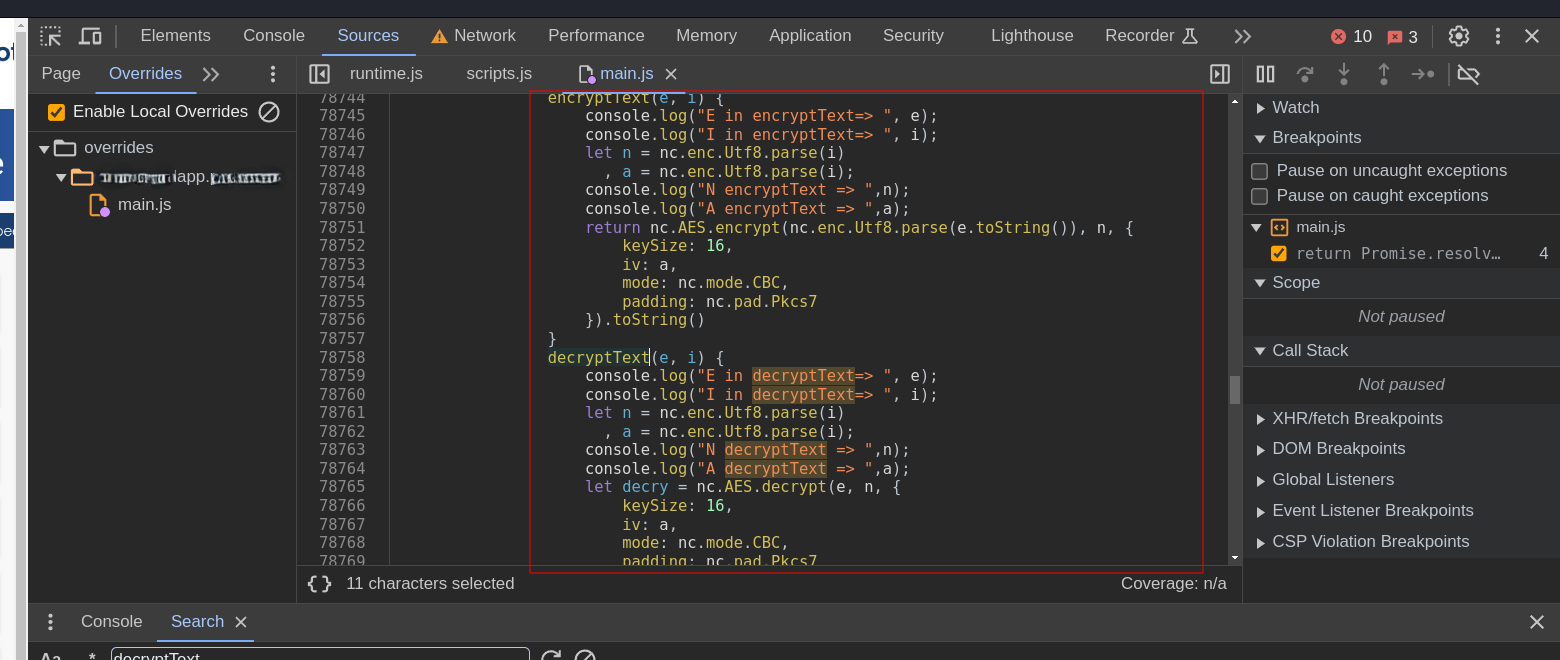
Lo and behold I had the IV in my browser console. I verified it by calling the decrypt() function (shown in the above screenshot) and passing the IV along with the encryptedRequest value. It gave me back the decrypted request parameters being used. The code was basically using the same IV input as the key, or, vice-versa. Either way I now have a way to decrypt the requests.
Now I just have to make a simple gadget in which I can put the IV and edit the requests or responses. I decided to reuse the code block from the minified code of the very web application being assessed to do this.
app.js
const express = require('express');
const bodyParser = require('body-parser');
const cors = require('cors');
const nc = require('crypto-js');

const app = express();
const port = 3000;

app.use(cors({ origin: '*' }));
app.use(bodyParser.json());
app.use(express.static(__dirname));

class Base64EncrypterDecrypter {
    encryptText(e, i) {
        let n = nc.enc.Utf8.parse(i),
            a = nc.enc.Utf8.parse(i);
        return nc.AES.encrypt(nc.enc.Utf8.parse(e.toString()), n, {
            keySize: 16,
            iv: a,
            mode: nc.mode.CBC,
            padding: nc.pad.Pkcs7
        }).toString();
    }

    decryptText(e, i) {
        let n = nc.enc.Utf8.parse(i),
            a = nc.enc.Utf8.parse(i);
        return nc.AES.decrypt(e, n, {
            keySize: 16,
            iv: a,
            mode: nc.mode.CBC,
            padding: nc.pad.Pkcs7
        }).toString(nc.enc.Utf8);
    }
}

const encrypterDecrypter = new Base64EncrypterDecrypter();

app.post('/encrypt', (req, res) => {
    const { text, key } = req.body;
    const encryptedText = encrypterDecrypter.encryptText(text, key);
    res.json({ encryptedText });
});

app.post('/decrypt', (req, res) => {
    const { encryptedText, key } = req.body;
    const decryptedText = encrypterDecrypter.decryptText(encryptedText, key);
    res.json({ decryptedText });
});

app.get('/', (req, res) => {
    res.sendFile(path.join(__dirname, '/index.html'));
});

app.listen(port, () => {
    console.log(`Server is running on http://localhost:${port}`);
});
index.html
<!DOCTYPE html>
<html lang="en">
<head>
    <meta charset="UTF-8">
    <meta name="viewport" content="width=device-width, initial-scale=1.0">
    <title>Encryption and Decryption</title>
    <style>
        body {
            font-family: Arial, sans-serif;
            margin: 20px;
            background-color: #f4f4f4;
        }

        h1 {
            text-align: center;
            color: #333;
        }

        form {
            margin-bottom: 20px;
            background-color: #fff;
            padding: 20px;
            border-radius: 8px;
            box-shadow: 0 0 10px rgba(0, 0, 0, 0.1);
        }

        label {
            display: block;
            margin-bottom: 10px;
        }

        input, textarea {
            width: 100%;
            padding: 10px;
            margin-bottom: 15px;
            box-sizing: border-box;
        }

        button {
            background-color: #4CAF50;
            color: white;
            padding: 10px;
            border: none;
            cursor: pointer;
        }

        button:hover {
            background-color: #45a049;
        }

        .result-container {
            margin-top: 20px;
            padding: 20px;
            background-color: #fff;
            border-radius: 8px;
            box-shadow: 0 0 10px rgba(0, 0, 0, 0.1);
            overflow: hidden;
            word-wrap: break-word;
        }

        textarea {
            height: 150px;
            resize: none;
        }
    </style>
</head>
<body>
    <h1>Encryption and Decryption</h1>

    <form id="encryptionForm">
        <label for="text">Text:</label>
        <textarea id="plainText" name="plainText" required></textarea>
        <br>
        <label for="encryptionKey">Key:</label>
        <input type="text" id="encryptionKey" name="encryptionKey" value="5fc6801bada241b3" required>
        <br>
        <button type="button" onclick="encrypt()">Encrypt</button>
    </form>

    <strong>Result</strong>
    <div id="encryptionResult" class="result-container"></div>

    <br>

    <form id="decryptionForm">
        <label for="encryptedText">Encrypted Text:</label>
        <textarea id="encryptedText" name="encryptedText" required></textarea>
        <br>
        <label for="decryptionKey">Key:</label>
        <input type="text" id="decryptionKey" name="decryptionKey" value="4fc6901baka341c5" required>
        <br>
        <button type="button" onclick="decrypt()">Decrypt</button>
    </form>

    <strong> Result </strong>
    <div id="decryptionResult" class="result-container"></div>

    <script>
        async function encrypt() {
            const text = document.getElementById('plainText').value;
            const key = document.getElementById('encryptionKey').value;

            const response = await fetch('http://localhost:3000/encrypt', {
                method: 'POST',
                headers: {
                    'Content-Type': 'application/json',
                },
                body: JSON.stringify({ text, key }),
            });

            const data = await response.json();
            displayResult(data.encryptedText, 'encryptionResult');
        }

        async function decrypt() {
            const encryptedText = document.getElementById('encryptedText').value;
            const key = document.getElementById('decryptionKey').value;

            const response = await fetch('http://localhost:3000/decrypt', {
                method: 'POST',
                headers: {
                    'Content-Type': 'application/json',
                },
                body: JSON.stringify({ encryptedText, key }),
            });

            const data = await response.json();
            displayResult(data.decryptedText, 'decryptionResult');
        }

        function displayResult(result, resultContainerId) {
            const resultDiv = document.getElementById(resultContainerId);
            resultDiv.innerHTML = `<p>${result}</p>`;
        }
    </script>
</body>
</html>
You can run the app.js with node by simply keeping both app.js and index.html files in the same directory and running:
$ node app.js
##
I’m going in!
Now it was time to dig further. I intercepted a simple login response from the server which gave me tons of information.
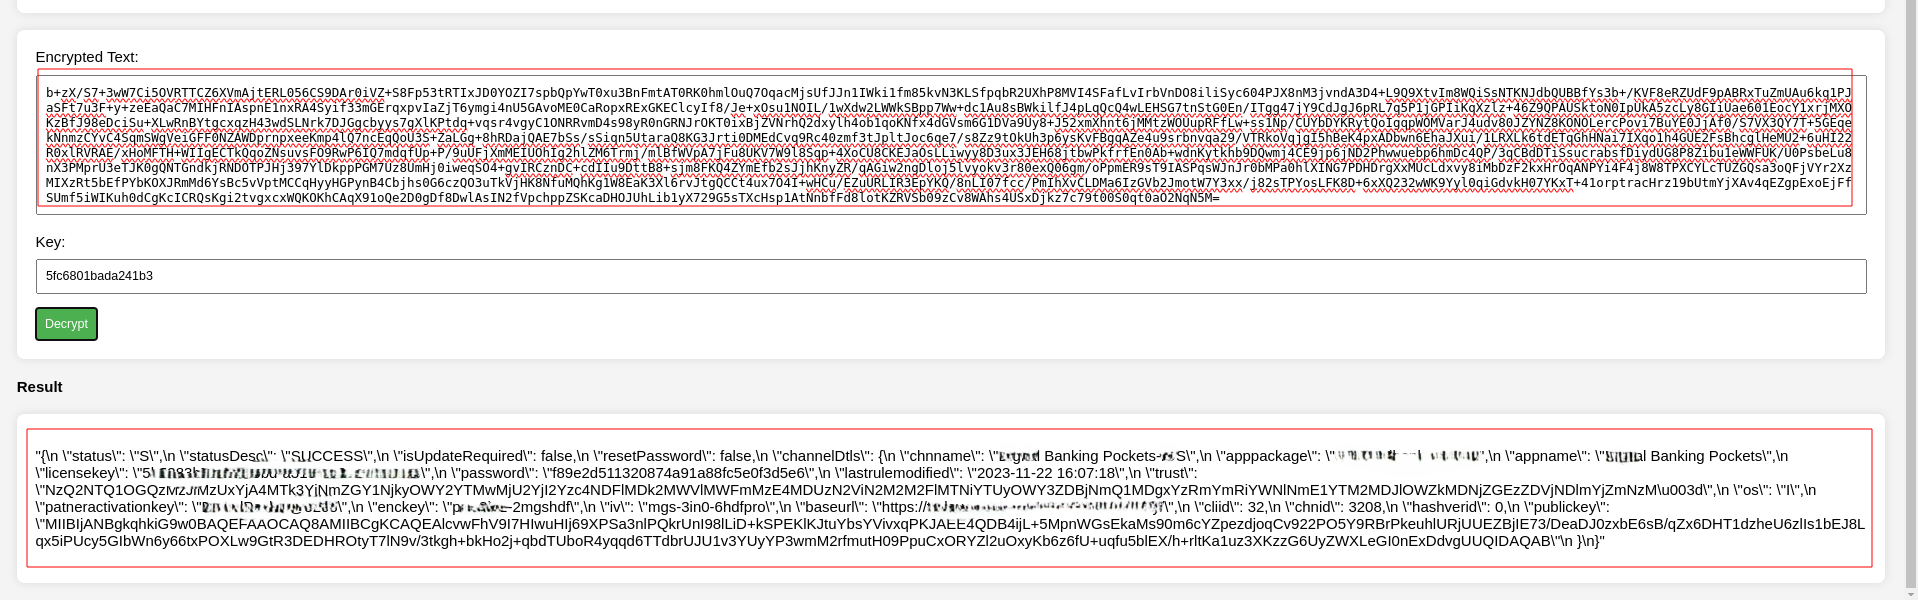 I got access to multiple keys like partner activation key, private and public keys but nothing much damaging.
Next I tried to upload a file. Upon inspection of the proxy history I saw two POST requests being made. First one had a shorter encrypted body than the second. This was an obvious giveaway that the second one was uploading the file content, but then what was the first one? I decided to decrypt the response for the first request in the chain aaaannnnnd………
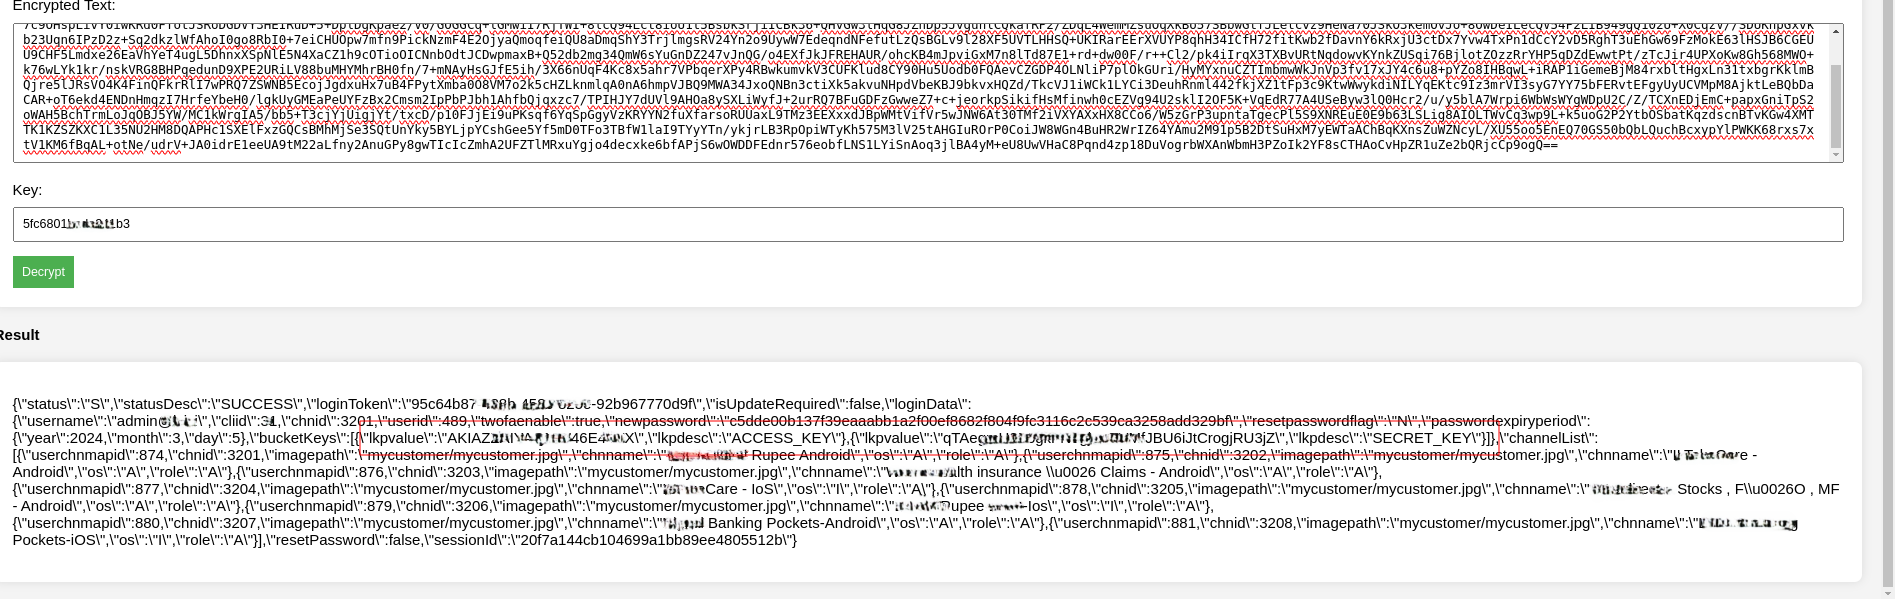
Kaboom! AWS Secret Keys! Now that’s some serious damage! I quickly set up the aws cli and fetched everything from the buckets.


I could have gone further but like most pentest engagements, I had limited time so I had to stop here. Also for the organization, this was enough evidence of compromise.
#
What could have been done better?
- Having application layer encryption or similar “maskings” aren’t always enough for shit designs. It’s important to learn and study secure system design (doesn’t matter whether you are a developer, software engineer or security engineer).
- Shortcut implementation of complicated security techniques often lead to more disasters. Later in this case, the organization had actually implemented rotational IV and secret keys which could be fetched by the frontend, provided if a specific nonce attribute matched (kinda like Anti-CSRF tokens you can say).
- Multi-platform -> At least “semi-multi” backend. :)